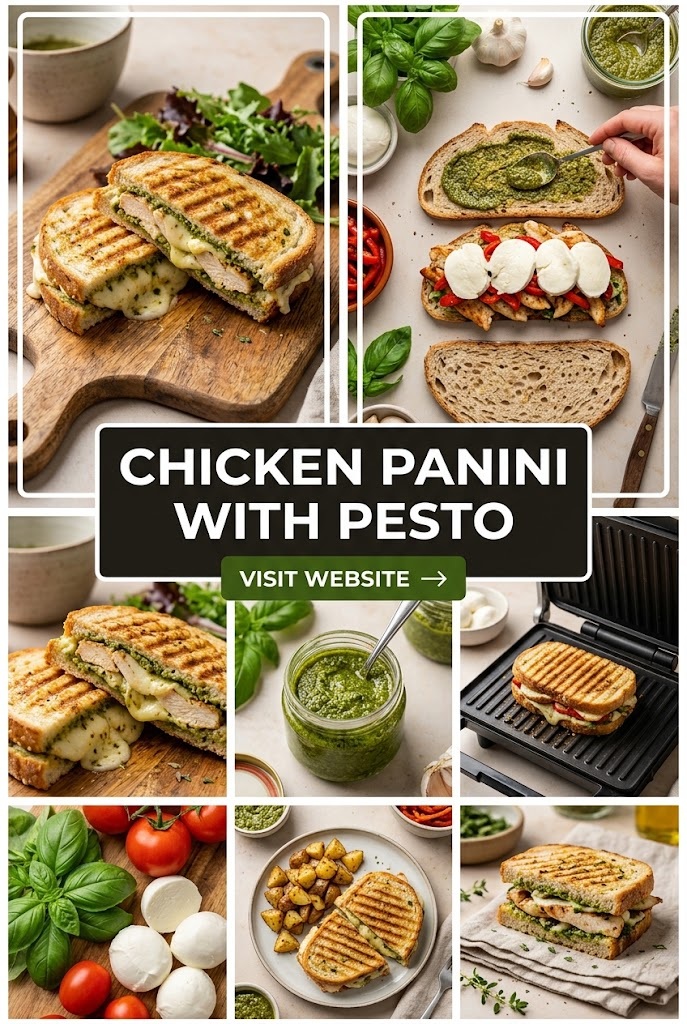
Chicken Panini with Pesto
There is a specific kind of magic that happens when high-quality ingredients meet the intense, rhythmic heat of a sandwich press. The result is the panini—a staple of Italian-inspired cafes that has taken the American culinary scene by storm. Among the vast pantheon of toasted sandwiches, one reigns supreme: the Chicken Panini with Pesto.
This isn’t just a sandwich; it is a structural marvel of textures and a symphony of Mediterranean flavors. From the crunch of artisanal bread to the succulent, herb-infused chicken and the vibrant, garlicky punch of basil pesto, every bite tells a story of balance. Whether you are looking for a quick weeknight dinner, a sophisticated lunch, or a crowd-pleasing party meal, mastering the chicken pesto panini is an essential skill for any home cook.
In this comprehensive guide, we will dive deep into every component of this legendary sandwich, exploring the history, the science of the perfect “crunch,” and the gourmet secrets that separate a soggy sandwich from a world-class panini.
The Anatomy of a Perfect Chicken Panini
To understand why the chicken pesto panini works so well, we have to look at its structural components. A panini is more than the sum of its parts; it is about the interaction between heat, pressure, and fat.
1. The Foundation: Selecting the Right Bread
The bread is the most critical element of a panini. It acts as the vessel that holds the moisture and fat of the fillings while providing the essential crunch. You cannot use standard sliced white bread; it will collapse under the pressure of the press.
- Ciabatta: This is the gold standard. Its high hydration levels and large air pockets allow it to absorb the oils from the pesto and chicken without becoming mushy. When pressed, the exterior becomes incredibly crispy while the interior stays chewy.
- Focaccia: Infused with olive oil and herbs, focaccia adds an extra layer of flavor. It’s softer than ciabatta but develops a beautiful golden crust.
- Sourdough: For those who prefer a bit of tang, a thick-cut sourdough provides a sturdy structure and a complex flavor profile that complements the sweetness of the basil.
- Baguette: A classic French baguette offers a more rustic, chewy experience. It’s ideal if you prefer a higher crust-to-filling ratio.
2. The Star: The Chicken
The chicken provides the protein and the bulk of the sandwich. How you prepare it determines the moisture level of the final product.
- Grilled Chicken Breast: Thinly sliced and seasoned with lemon, garlic, and oregano. Grilling adds a smoky charred flavor that pairs beautifully with pesto.
- Rotisserie Chicken: The ultimate time-saver. It is naturally moist and easy to shred or slice.
- Sous Vide Chicken: For the gourmet enthusiast, sous vide ensures the chicken is perfectly juicy, preventing that “dry sandwich” syndrome.
- Breaded Cutlet (Milanesa style): If you want a “Chicken Parm” vibe, a thin, crispy breaded chicken cutlet adds an extra layer of crunch.
3. The Soul: The Pesto
Pesto is the “glue” that holds the flavors together. While store-bought pesto is convenient, a homemade version transforms the sandwich from ordinary to extraordinary.
- Classic Pesto alla Genovese: Fresh basil, toasted pine nuts, garlic, Parmigiano-Reggiano, Pecorino Fiore Sardo, and high-quality extra virgin olive oil.
- Sun-Dried Tomato Pesto (Pesto Rosso): For a sweeter, deeper flavor profile.
- Arugula Pesto: Adds a peppery bite that cuts through the richness of the cheese.
4. The Melt: Choosing the Cheese
The cheese acts as a moisture barrier and a flavor enhancer. You need a cheese that melts well but doesn’t completely disappear.
- Fresh Mozzarella: The traditional choice. It’s creamy and mild.
- Provolone: Offers a sharper, more distinct flavor and a fantastic “cheese pull.”
- Fontina: An Italian alpine cheese that is famous for its superior melting capabilities.
- Gruyère: For a nutty, sophisticated twist.
Step-by-Step: The Ultimate Chicken Pesto Panini Recipe
This recipe is designed to produce a restaurant-quality panini in your own kitchen.
Ingredients (Makes 2 Large Paninis)
For the Chicken:
- 2 small boneless, skinless chicken breasts (flattened to 1/2 inch thickness)
- 1 tbsp olive oil
- 1 tsp dried oregano
- 1/2 tsp garlic powder
- Salt and freshly cracked black pepper to taste
- A squeeze of fresh lemon juice
For the Pesto (or use high-quality store-bought):
- 2 cups fresh basil leaves
- 1/4 cup toasted pine nuts (or walnuts)
- 1/2 cup grated Parmesan cheese
- 2 garlic cloves
- 1/2 cup extra virgin olive oil
For the Sandwich Assembly:
- 1 large Ciabatta loaf (split lengthwise) or 2 Ciabatta rolls
- 4-6 slices of fresh Mozzarella or Provolone
- 1 large vine-ripened tomato, thinly sliced
- 1/2 red onion, very thinly sliced (optional)
- A handful of fresh baby spinach or arugula
- Butter or olive oil for brushing the bread
Instructions
Phase 1: Prepare the Chicken
- Seasoning: Rub the chicken breasts with olive oil, oregano, garlic powder, salt, and pepper.
- Cooking: Heat a grill pan or skillet over medium-high heat. Cook the chicken for about 5-6 minutes per side until the internal temperature reaches 165°F (74°C).
- Resting: Let the chicken rest for at least 5 minutes before slicing. This keeps the juices inside. Slice into thin, diagonal strips.
- The Lemon Finish: Squeeze a bit of fresh lemon over the sliced chicken to brighten the flavors.
Phase 2: Make the Pesto
- Pulse the basil, pine nuts, and garlic in a food processor until coarsely chopped.
- Add the Parmesan cheese and pulse again.
- While the processor is running, slowly drizzle in the olive oil until a smooth paste forms. Season with salt to taste.
Phase 3: Assembly
- Prep the Bread: Slice your ciabatta in half. On the bottom half, spread a generous layer of pesto.
- Layering for Structure: Place a layer of cheese on the bottom. This acts as a “glue” for the chicken.
- Add the Proteins and Veggies: Layer the sliced chicken over the cheese. Follow with the tomato slices and red onion.
- Greens and Final Cheese: Add the spinach or arugula. Top with one more layer of cheese. This “double cheese” method ensures the sandwich stays together.
- The Top Bun: Spread a thin layer of pesto on the top half of the bread and close the sandwich.
Phase 4: Pressing to Perfection
- Preheat: Get your panini press or grill pan nice and hot.
- Fat for Crunch: Brush the outside of the bread with melted butter or olive oil. This is the secret to that golden-brown, shattered-glass crunch.
- The Press: Place the sandwich in the press. Close the lid and apply moderate pressure.
- Timing: Cook for 4-6 minutes. You are looking for deep golden grill marks and cheese that is visibly oozing from the sides.
- Cooling: Let the panini sit for 1 minute before slicing. This allows the cheese to set slightly so the fillings don’t slide out.
The Science of the Press: Panini Press vs. Skillet
While a dedicated panini press is the easiest way to achieve the classic “ridged” look, you don’t necessarily need one to make a world-class sandwich.
Using a Panini Press
The advantage of a press is dual-sided heating. It cooks the top and bottom simultaneously while the weight of the lid compresses the ingredients. This creates a dense, integrated texture where the pesto and chicken juices meld into the bread.
The Skillet and “Brick” Method
If you don’t have a press, you can use a cast-iron skillet.
- Place the sandwich in a hot, buttered skillet.
- Place a second heavy skillet (or a brick wrapped in foil) on top of the sandwich.
- Cook for 3 minutes, then flip the sandwich, replace the weight, and cook for another 3 minutes. This method often results in a crunchier exterior because the bread has more direct contact with the pan.
Gourmet Variations: Elevating Your Panini Game
Once you have mastered the basic recipe, you can experiment with these gourmet twists to keep things exciting.
1. The “Californian” Chicken Pesto
- Additions: Fresh avocado slices and sprouts.
- Why it works: The creaminess of the avocado balances the herbal intensity of the pesto. Use sourdough for this version.
2. The “Spicy Italian”
- Additions: Pickled pepperoncini, Calabrian chili paste mixed into the pesto, and spicy salami.
- Why it works: It adds heat and acidity, cutting through the rich mozzarella.
3. The “Sweet and Savory”
- Additions: A drizzle of balsamic glaze and a few thin slices of fresh pear or fig.
- Why it works: The fruitiness complements the basil and the savory chicken beautifully.
4. The “Roasted Veggie” Powerhouse
- Additions: Roasted red peppers, grilled zucchini, and caramelized onions.
- Why it works: It adds bulk and nutritional value, making it a much heartier meal.
Pro Tips for Avoiding Common Panini Pitfalls
Even the best ingredients can result in a mediocre sandwich if handled incorrectly. Here are the professional secrets to panini success:
Avoiding the “Soggy Bottom”
- The Moisture Barrier: Always place the cheese directly against the bread. If you put the tomatoes or pesto directly against the bread and let it sit before pressing, the moisture will soak into the crumb, making it soggy.
- Dry Your Veggies: After slicing tomatoes, pat them dry with a paper towel to remove excess juice.
- Toast Internally: If you have extra time, lightly toast the inside of the bread before adding the fillings.
Achieving the Perfect Melt
- Room Temp Cheese: Cold cheese takes longer to melt, which might lead to the bread burning before the center is gooey. Let your cheese sit out for 15 minutes before assembling.
- Thin Slices: Use multiple thin slices of cheese rather than one thick slab. Thin slices melt more evenly and quickly.
Managing the Chicken
- Slice Against the Grain: When slicing your grilled chicken, always go against the grain. This makes the chicken “bite-through” tender rather than stringy.
- Don’t Overcook: Remember that the chicken will receive a “second cooking” when the panini is pressed. Pull it off the grill when it’s just barely done to ensure it stays succulent.
What to Serve with a Chicken Pesto Panini
A panini is a heavy, rich sandwich. To make it a complete meal, you need sides that offer contrast—either through acidity, crunch, or lightness.
- Classic Tomato Basil Soup: There is no pairing more iconic. The acidity of the tomato cuts through the pesto’s oil, and the soup acts as a perfect dip for the crusty bread.
- Arugula Salad with Lemon Vinaigrette: A simple salad of arugula, shaved Parmesan, and a sharp lemon dressing provides a refreshing palate cleanser between bites of the rich panini.
- Sweet Potato Fries: For a comfort food vibe, the sweetness of the potatoes pairs excellently with the garlic and herb notes of the sandwich.
- Mediterranean Pasta Salad: A cold pasta salad with olives, feta, and cucumbers keeps the Italian theme going.
- Pickles: A high-quality kosher dill pickle provides the necessary crunch and vinegar to balance the fats.
The Nutritional Profile: Is a Chicken Panini Healthy?
When made with fresh, whole ingredients, a chicken pesto panini can be a well-balanced meal.
- Protein: Chicken breast is one of the leanest sources of high-quality protein, essential for muscle repair and satiety.
- Healthy Fats: Pesto is loaded with monounsaturated fats from olive oil and pine nuts, which are beneficial for heart health.
- Antioxidants: Basil contains powerful antioxidants and essential oils that have anti-inflammatory properties.
- Complex Carbohydrates: If you choose a whole-grain ciabatta or sourdough, you are getting fiber and slow-release energy.
Calorie Management Tip: If you are watching your caloric intake, use pesto sparingly (a little goes a long way) and opt for a “part-skim” mozzarella. You can also load the sandwich with more greens and peppers to add volume without adding many calories.
Meal Prep and Storage
The chicken pesto panini is an excellent candidate for meal prep, provided you follow a few rules.
How to Prep Ahead
- Cook the Chicken: Grill a large batch of chicken at the start of the week.
- Make the Pesto: Homemade pesto stays fresh in the fridge for up to 5 days if you cover the top with a thin layer of olive oil to prevent oxidation.
- Assemble Without Pressing: You can assemble the sandwiches (minus the tomatoes) up to 24 hours in advance. Wrap them tightly in parchment paper or foil.
Reheating Tips
If you have a leftover pressed panini, don’t use the microwave—it will make the bread rubbery.
- Air Fryer: Reheat at 350°F for 3-4 minutes. This restores the crunch perfectly.
- Toaster Oven: Place on a wire rack at 375°F for 5-7 minutes.
- Back in the Pan: A few minutes in a dry skillet over medium heat will help crisp the bread back up.
Frequently Asked Questions
Can I make this vegan?
Absolutely. Use grilled tofu or “chick’n” strips. Replace the cheese with a vegan mozzarella alternative (cashew-based ones melt best), and make the pesto using nutritional yeast instead of Parmesan.
What if I don’t have a panini press or a heavy pan?
You can use a regular toaster for the bread and then assemble the sandwich, but you will miss out on the “integration” that happens when the sandwich is compressed while hot. Another trick is to use a George Foreman grill if you have one tucked away in a cupboard!
Can I use frozen chicken?
It is best to thaw the chicken completely before cooking to ensure even browning. If you use frozen pre-cooked chicken strips, make sure they are fully heated through before they go into the panini, as the pressing time may not be enough to heat them from frozen.
Why is my pesto turning brown?
Pesto oxidizes when exposed to air. To keep it vibrant green, you can blanch the basil leaves in boiling water for 5 seconds and then shock them in ice water before blending. Alternatively, always keep a layer of olive oil on top of the pesto in its storage container.
The Cultural Rise of the Panini
The word panini is the plural of panino, which simply means “small bread roll” in Italian. While sandwiches have existed for centuries, the modern “panini” as we know it—pressed and toasted—emerged in the paninoteche (sandwich bars) of Milan in the 1970s and 80s.
It became a symbol of a new, fast-paced urban lifestyle. Young Italians, known as “Paninari,” would gather at these bars, wearing designer clothes and eating these stylish, toasted sandwiches. By the late 90s, the trend had crossed the Atlantic, finding a permanent home in American cafes from New York to Los Angeles.
The Chicken Pesto version specifically reflects the American love for the “Club” sandwich reinvented with Mediterranean flair. It bridges the gap between casual deli food and fine Italian ingredients.
Conclusion: Why This Sandwich Endures
The Chicken Panini with Pesto is more than just a trend; it is a perfected culinary concept. It hits every sensory requirement: the sound of the crunch, the sight of the melted cheese, the smell of toasted garlic and basil, and the satisfaction of a hearty, protein-packed meal.
By focusing on the quality of your bread, the juiciness of your chicken, and the freshness of your pesto, you can create a meal that rivals any high-end bistro. It is a versatile, dependable, and deeply delicious sandwich that deserves a spot in your weekly rotation.
So, fire up that press, slice into some fresh ciabatta, and experience the glorious harmony of the perfect chicken pesto panini. Your taste buds will thank you.